A lot of people asked us how to achieve a vortex effect in 3ds Max, so we decided to make a short tutorial about the usage of mParticles. This is not an in-depth tutorial, in some cases we only broach the subject, a detailled tutorial would break the mold.
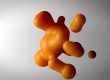
What we are going to create:
If you have any questions please feel free to comment the blog or contact us here.
Let`s get started:

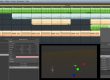
Step 1: First go to Particle View (press 6) and apply a Birth Grid Operator. Create a torus, that is used to define an area, where the particles are emitted. The grid is restricted by a mesh volume, so be sure to place the torus inside the Birth Grid. Afterwards you can hide the object – you`ll just need it as a reference for the simulation.

Step 2: Next apply a Shape Instance Operator to give the particles a shape. We chose a group of mushrooms as Particle Geometry Object – for testing purposes you can also use a simple box or any other low-poly geometry. If you use a group of objects, check the „Group Members“ – checkbox and „Object and children“ to treat the group members as seperate particles

Step 3: Apply a MassFX Shape Operator and set it to „Collide as Convex Hull“ to create a bounding mesh around the mushrooms. You can display the bounding mesh by choosing „Shaded“ in the „Display as“ menu.

Step 4: Add a Rotation Operator and set the Orientation Matrix to „Random 3D“, so the particles are oriented in random directions when they are emitted.

Step 5: Create a vortex force right in the middle of the mushrooms. Apply a MassFX Force Operator and add the Vortex Force as „Force Space Warp“. You have to play around with the settings of the vortex force to get a satisfying result. The settings depend on the scaling of your scene.

Step 6: Apply one more MassFX Force Operator and add two wind forces. Move one of the wind forces above the mushrooms pointing downwards and one wind force under the mushrooms pointing upwards to restrict the movement of the mushrooms in z-axis. Give the wind forces some turbulence for a little more variation.

Step 7: Next apply a Spin Operator to rotate the particles in random directions during simulation.

Step 8: Next you have to make sure, that global gravity is inactive. Apply a MassFX World Operator and uncheck the „Apply Gravity“ checkbox. For rendering you should cache the particles to disk. The randomness of some parameters would effect the simulation and every time you restart 3ds Max or use network rendering you`ll get different results.

Step 9: We rendered the scene in mental ray with a basic studio setup including a backplate and three Photometric Free Rectangle Lights. Set the Shadows to „Ray Traced Shadows“ and the Light Distribution to „Uniform Diffuse“. Increase the Shadow Samples to get smoother shadows (will slow down rendertime). In Camera settings enable the Multi-Pass Effect „Depth of Field (Mental Ray)
If you have any questions please feel free to contact us here.