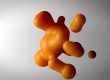
In this tutorial we want to show you how to use PFlow and the Displace Modifier in 3ds Max to create abstract renderings like the following.
I first saw such renderings on Lee Griggs´ website. He used XGen in Maya and the Arnold software renderer to create those very inspring images:
leegriggs.wordpress.com
After searching the web I found a very useful video tutorial from Particle Skull on Vimeo to achieve a similar effect in 3ds Max:
Particle Skull on Vimeo
In the following tutorial I want to show you my own workflow in 3ds Max and Mental Ray without using any plugins or extensions.
If you have any questions please feel free to contact us here.
Let´s get started:

Step 1
First we have to setup the World Scale. Go to „Customize“ – „Units Setup“ and set the „Display Unit Scale“ to Metric. Open the System Unit Setup dialogue and set „1 Unit = 1,0 Centimeters“.

Step 2
In Top View create a plane. The size of the plane depends on the texture map you have chosen. In my case the texture map has a resolution of 4.247 x 2.637 px so the plane´s size is 2,637m x 4,247m . Set the plane´s coordinates to 0,0,0 and the Length and Width Segs to 1.000.

Step 3
Open the Material Editor (M). We want to render the scene in Mental Ray so create a new Arch & Design Material. If you want to render the scene with another Engine you can also use a V-Ray Material or a Standard Material. Assign your texture to the diffuse slot of the Material and attach it to the plane.

Step 4
Apply a Displace Modifier to your plane and add the Bitmap from the Diffuse Slot to it´s Map Slot. Set the Strength to 0,08m and the Blur to 0,03.

Step 5
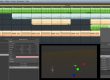
Let´s setup the PFlow System. Press 6 on your keyboard or go to „Graph Editors“ – „Particle View“ to open Particle View. Drag in a Standard Flow and delete the Speed and the Rotation Operators. Click on your PF Source and set the Quantify Multiplier to 5%. Set the Upper Limit for the Particle Amount to 10.000.000.

Step 6
In the Birth Operator set the Emit Start and Stop to 0. Set the Particle Amount to 200.000.

Step 7
Replace the Position Icon Operator with a Position Object Operator. Add the plane to it´s Emitter Objects list.

Step 8
Drag a Mapping Object Operator to the first Event and add the plane to it´s Mapping Objects list.

Step 9
Drag a Material Static Operator to the first Event and drag your Arch & Design Material to the Material Slot.

Step 10
In the Display Operator change the Display Type to Geometry.

Step 11
Drag a Scale Operator to the first Event. Position it below the Shape Operator. Uncheck the Constrain Properties button and set the X and Y Scale Factor to 4,0%. Set the Z Scale Factor to 100,0%.

Step 12
Add a Free Ligth to your scene. Position it at 0,0m; 0,0m; 2,0m. Turn on Shadows and set them to „Ray Traced Shadows“. Set the Light Distribution Type to „Uniform Diffuse“. Set the Resulting Intensity to 20,0%. Change the Emit light Shape to „Rectangle“ and set the Length and Width to 4,0m.

Step 13
Add a camera to your scene. In this case I used an 85,0mm Lens. Enable Depth of Field (mantal ray) and set the f-Stop to 1,8. Render the scene.
Further Information
If you want to try another texture in your scene you just have to change the Map in the Material Editor. Replace the Map in the Displace Map. You have to reload your PF Source (turn off / turn on) to recalculate the Mapping Object operator. In some cases you have to play with the Strength and Blur parameters of the Displace Modifier to get nice results.
Optimize your Scene
• Replace the Shape Operator with a Shape Instance Operator. You can use here any Geometry like a Sphere or a Chamfer Box but keep in mind that the Poly Count of the PFlow System is limited.
• Light your scene with an HDR. In this tutorial you learn how to setup an HDR.
If you have any questions please feel free to contact us here.